Export your model as a .fbx or .gltf to take advantage of all of Studio's 3D import features. When rigging or skinning a layerable model, these file types contains all the mesh and texture data, including the rig and influence data, you need to later import into Studio.
Check that your model meets Roblox's avatar character specifications before exporting to ensure Studio compatibility.
Before exporting
Before exporting, ensure that you are only exporting the Roblox supported objects related to your model. If you have any modifiers to your mesh or project objects, make sure to apply or delete them before export.
Use the following guidance before exporting:
While your mesh objects must be parented within an armature object, you can also parent your outer cage objects to a single empty object to simplify your workspace.

In the cage parent object, ensure you have an outer cage for each of your 15 body parts with appropriate naming affix.

In the armature object, ensure that you include the all 15 mesh objects and 19 attachments with the appropriate naming affix.

- When exporting characters with animation or FACS animation, ensure that your animation timeline Start and End include the entire range of your animations.

Blender
Blender allows you to export in .fbx or .gltf as well as other formats. If you are using .fbx export, familiarize yourself with Blender's FBX scaling to ensure that you successfully import the model into Studio at the correct scale.
Export settings
- In the topbar, click File > Export > FBX (.fbx). The Blender file browser window displays.
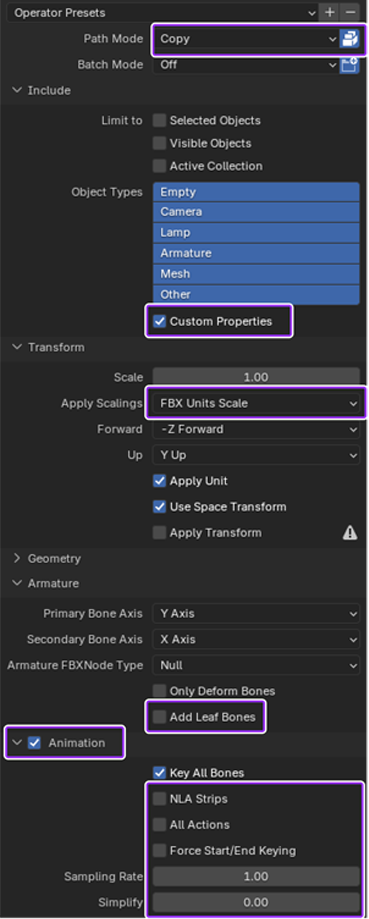
- Set Path Mode to Copy and enable the Embed Textures icon.
- In the Include section, enable Custom Properties.
- If your project doesn't already have .01 scene unit scaling, set the Transform > Apply Scalings to FBX Unit Scale. For more details, see Blender FBX scaling.
- Expand the Armature section and uncheck Add Leaf Bones.
- Enable Bake Animation.
- Expand Bake Animation and uncheck NLA Strips, All Actions, and Force Start/End Keyframes.
- Ensure your project animation timeline has the correct Start and End range of all your keyframes.
- In Bake Animation, set Simplify to 0.0.
- Click the Export FBX button. Save the .fbx to the directory of your choice.

Maya export settings
To export a mesh in Maya as a .fbx file:
In the topbar, click File. A pop-up menu displays.
Select Export All. The Export All window displays.
Near the bottom of the window, click the Files of type dropdown, then select FBX export.
On the right-hand side of the window, navigate to the Options... section.
In the Geometry section, enable Smooth Mesh and Referenced Asset Content.
In the Animation section, enable Animation. Avatar characters with facial animation data require animation data.
Enable Bake Animation.
If you need to import textures as a .png, in the Embed Media section, enable Embed Media.
In the Advanced Options section,
- Navigate to Units, then enable Automatic.
- Navigate to Axis Conversion, then set the Up Axis property to Y.
Click the Export All button.

After exporting, use Studio's 3D importer to import your model. See Test characters in Studio for additional importing and testing information.