Studio's Animation Editor lets you import animations into your projects. The following instructions detail how to import a .fbx file with animation data into Studio, convert it into a CurveAnimation object with an asset ID, then use that asset ID in Animation objects that you can use in your games, upload to the Marketplace, or share with other creators.
It's important to ensure your emote meets Roblox's emote specifications to use or sell this asset as an avatar-ready emote, otherwise you can encounter errors at different points in the workflow.
Import into Studio
To import your asset as an animation:
If you don't already have a character body with a standard R15 rig, add one to your project in Studio.
In the Avatar tab, click the Character button.

Set Rig Type to R15.
Set Body Shape to either Masculine or Feminine.
Select an avatar style from the provided options. An avatar character body with a standard rigging armature displays in the viewport.
Open the Animation Editor.
- In the Avatar tab, click the Clip Editor button.
- Select the character with a standard rigging armature. The Animation Editor updates accordingly.
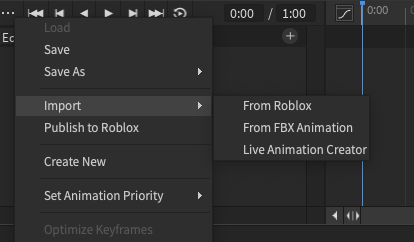
In the Animation Editor, select ⋯ > Import > From File and select your .fbx file. Your animation populates in the Animation Editor's timeline.


Generate asset ID
To generate an asset ID for your animation, you must first convert your animation data in the timeline into a CurveAnimation object. When you save the CurveAnimation object, Roblox creates a cloud-based asset ID to represent your emote.
To convert an existing keyframe sequence to a CurveAnimation:
In the Animation Editor, select the Curve Editor button next to the timeline. A confirmation prompt displays.

Press Confirm to convert your keyframes into a CurveAnimation clip.

Back in the Animation Editor, select the ⋯ > Publish to Roblox. The Asset Configuration window displays.

Add a title and description, then click the Save button. The Asset Configuration window updates with a copyable asset ID.


Create an Animation object
To submit an emote to the Marketplace, you must submit an Animation object with the AnimationId property set to the asset ID of your CurveAnimation object.


To create an Animation object you can publish as an emote:
- In the Explorer window, add a new Animation object.
- In the Properties window, add the asset ID of your emote animation.
Upload emote to Marketplace
When you have an Animation object with your emote animation asset ID set, you can upload the emote to the Marketplace. This process requires an upload fee of 80 Robux.
- In the Explorer window, right-click the Animation object and select Save to Roblox. The Asset Configuration window displays.
- Configure the following fields:
- Add a title and description.
- Set the Content Type to Avatar Item.
- Set the Asset Category to Emote.
- Click the Submit button to upload your asset for moderation.
For more information on the upload and publishing process, see Publish to Marketplace.