Roblox's Adaptive Animation system allows animations to play seamlessly between custom characters with unique body types, rigs, and proportions. This feature utilizes HumanoidRigDescription and DigitsRigDescription objects within your character model so that you can customize, modify, and map the internal joints of your custom character for universal animation support.
After importing a character rig, you can access several Studio tools to help you remap your joints and set a baseline T-pose reference to better support animations. After configuring your rig, your custom character can playback any R15 animation, or any animation that has been published from a character with HumanoidRigDescription and DigitsRigDescription objects.


Modify custom character rig
When importing a rig as a Custom Humanoid, Studio attempts to automatically configure the model's HumanoidRigDescription and DigitsRigDescription objects. When necessary, you can use the joint assignment and T-pose tools to fine-tune or adjust the automated changes.
Import model
Use the 3D Importer to import a character model, then use the Adaptive Animation system to add HumanoidRigDescription and DigitsRigDescription objects:
- In the Home tab, click the Import button to open the 3D Importer. A file browser opens.
- Select your rigged character's .fbx or .gltf file. The 3D Importer loads a preview of the character model.
- In the Rig General section, set Rig Type to Custom.
Select the Import button. The character displays in your workspace as a Model.
In the Avatar tab, click the Adaptive Animation button. The Remap Rig panel displays.
In the Remap Rig panel, click the Create button. The Adaptive Animation systems generates a HumanoidRigDescription object and a DigitsRigDescription for each hand.


Assign joints
The Adaptive Animation system requires at least 15 of your character's joints to map to Roblox's standardized 15 joints skeleton. While the automated import process attempts to make this assignment automatically, you can verify and reassign joints by using the joint assignment tool.
When you select your model's HumanoidRigDescription or DigitsRigDescription objects, the joint assignment tool's visual picker displays in the top right of the 3D viewport with a view of the standard Roblox skeleton. To assign joints, you can either click the joints in the 3D viewport or visual picker, then click the corresponding joint in the other view. When a joint is assigned, the joint icon turns orange in both the 3D viewport and the visual picker.
When using the joint assignment tool, the visual picker displays:
- All 15 standard joint assignments that you are required to assign to your character's rig as a filled-in gray circle.
- All additonal joint assignments that you are not required to assign to your character's rig as empty circle outlines. If your rig is compatible with these extra joints, you can assign them appropriately to help improve animation quality.

To access and use the joint assignment tool:
- In the Explorer window, expand the model you just imported and select the child HumanoidRigDescription. The Adaptive Animation toolbar displays with the joint assignment tool active, and your character's mesh objects become semi-translucent so you can view its internal joints.
- In the 3D viewport, click a joint within the character's body, then in the visual picker, select the corresponding joint. The joint indicator turns orange to indicate that it has been assigned.
- If your character's rig includes optional joints in its hands,
Navigate back to the Explorer window, then select one of your model's child DigitsRigDescription objects. The visual picker updates to display a view of your character's left or right hand.
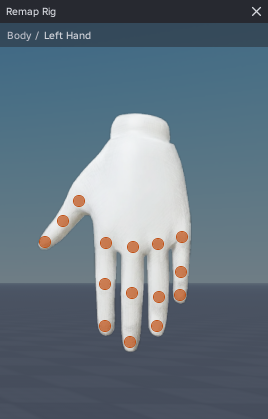
Assign each optional joint by clicking a joint on the hand, then selecting the corresponding joint in the visual picker.
Repeat this process for the character's other child DigitsRigDescription object.

Create t-pose
To ensure universal animation support, it's important to set up a standard T-pose configuration as a baseline reference for your character. The Adaptive Animation toolbar offers a T-pose mode with tooling to either automatically position your character to match T-pose requirements, or modify the position and rotation of your joints to ensure the best animation results.


To create a T-pose using T-pose mode:
In the Adaptive Animation toolbar, select the T-pose mode button to switch to T-pose mode.

Select the Enforce T-pose button to automatically position your character for T-pose requirements.

If you need to make adjustments to your character's T-pose,
If you want to rotate both left and right limbs simultaneously, enable the left and right symmetry icon.

Select one of the upper arm joints near the shoulder. The joint turns blue to indicate that it is selected.
Use the Rotate tool to rotate the joint into a T-pose.
If necessary, position the legs and other areas of the body until your rig is in a T-pose.
To test your rig's T-pose,
- Navigate to the Adaptive Animation toolbar, then use the dropdown to select an animation.
- Press the play icon. If an animation doesn't animate correctly, you may need to remap or re-pose your character's rig.


