Assistant is an AI helper that helps you build games faster by answering questions, generating content, and performing actions directly in Studio. It can do the following and much more:
- Answer questions about Roblox development
- Create and modify objects and scripts in your place's data model
- Insert assets from the Creator Store
- Explain selected code in the Script Editor
- Generate materials to restyle your objects
- Generate 3D meshes and procedural models to populate your scene
In Studio, Assistant combines a large language model (LLM) with a run-command system that can act directly on your data model. It can insert and modify objects, create scripts, and automate repetitive tasks such as updating properties in bulk.
For a more in-depth look at what Assistant can do and how to use it, see the Prompt guide and examples and the following Roblox Staff livestream for tips, tricks, and inspiration.
Access Assistant from Studio
To access Assistant from Studio:
Click Assistant on the right side of the mezzanine bar.

Enter a request in the Assistant window.
- To generate a new response, click the redo icon.
- To rate the response and improve future results, click thumbs up or thumbs down.


Chats and chat history
Assistant supports multiple chat threads per place, and your chat history is saved in the cloud so conversations persist across Studio sessions, machine restarts, and devices.
- Click the chat list button and select New Chat at the top of the list to start a separate conversation. Each chat has its own context window, so a long conversation in one chat won't consume space available in another. Drafts in the input box are preserved per-chat.
- Click the branch icon under any Assistant response to spin off a new chat from that message. The original chat remains as-is so that you can explore a different direction without losing your current place.
- Chats are scoped to the place you're working in, not the experience. Each place has its own set of conversations, and there is no hard limit on the number of chats per place.
- Deleted chats are removed permanently and cannot be recovered.
If you have Studio open on multiple devices, we recommend working in one chat at a time to avoid conflicts, since chat history syncs through the cloud.
Screen capture subagent
Assistant includes a screen capture subagent that can capture what's currently visible in your 3D viewport (both Edit and Play modes) and describe it back to Assistant. This functionality lets Assistant reason about your scene without you having to describe it. You can ask questions like "Does this look right?" or "Is the lighting set up for nighttime?" and Assistant will capture a screenshot of the viewport and answer based on what it sees.
If you're using a third-party client via MCP or your own API key, you continue to have direct access to the underlying screenshot tool.
Ask questions and explain code
If you need general knowledge or help while creating a game, you can ask Assistant questions like how to make a team system, how to design a game loop, how to use specific Studio tools, and much more. It can even explain code that it generated or that you wrote yourself.

Edit your place
Scripts
Assistant can insert new scripts, modify existing ones, and perform these actions across multiple objects as necessary. For example, if you ask it to create a remote event, it can create a local script, a server script, and the event all at once.
If you enter a script generation request like "Make the player's character jump when they touch this part," Assistant shows the script's contents and adds the new script instance to the currently selected object in the data model. If nothing is selected, Assistant decides where to place it based on your prompts.
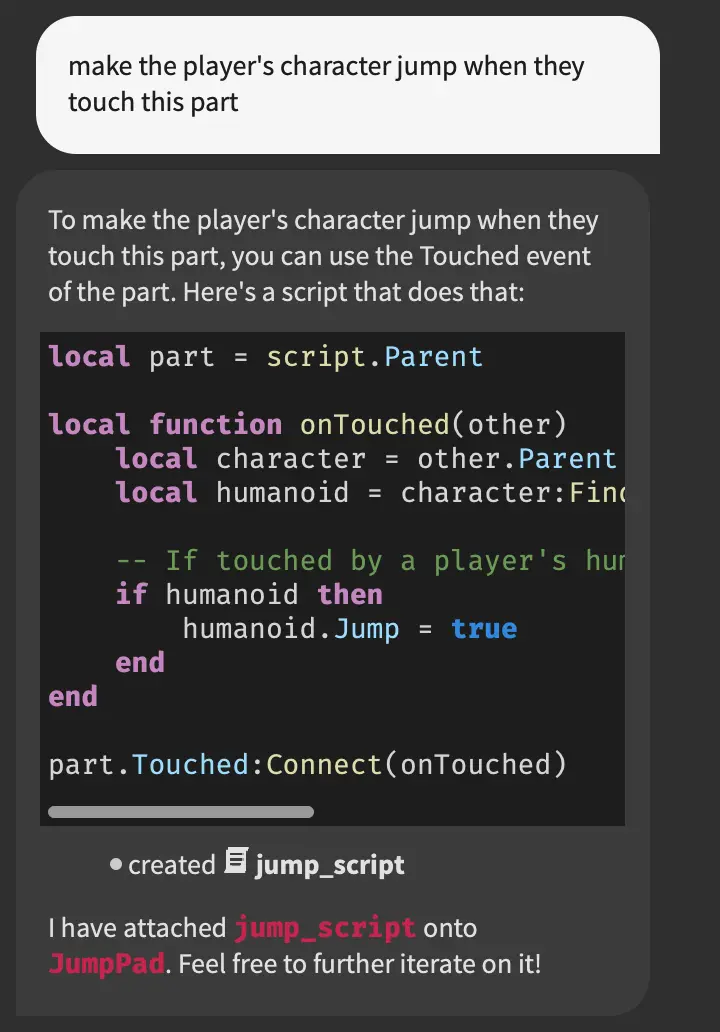
The generated script might not function flawlessly. In these cases, you can either make further edits in the Script Editor or ask Assistant to edit the script it just created. It can even act on existing scripts that it didn't create if you need help with code that you've written yourself.
Objects and Creator Store assets
Assistant can create, edit, delete and iterate on instances in your data model, including inserting items from the Creator Store.

If you examine the code, you can see that Assistant calls InsertService:GetFreeModels() to query the Creator Store for a wheelbarrow model and uses Model:PivotTo() to place it near a tree.
Search and insert assets
Assistant infers when to look for assets on the Creator Store or in your inventories based on your prompt, then presents relevant options for you to choose from before anything is placed in your workspace. Search and insert supports:
- Both free and paid assets on the Creator Store.
- Your personal and group inventories.
- Filtering by asset type, including Model, Audio, Mesh, MeshPart, Image, Decal, Video, and Package.
- Creator Store filters for price, audio duration, and verified creators.
To insert a specific asset directly by its ID, use the /insert_asset slash command in Assistant.
Generate content
Materials
When given a request to generate a material, Assistant in Studio can quickly style existing parts with a lightweight version of the Material Generator.

Meshes
To generate a textured 3D mesh:
- Use the /generate command followed by your prompt. For example, /generate_mesh a red buggy with knobby tires.
- Ask Assistant to create a mesh directly. For example, "Make a futuristic crate."
- Prompt with a reference image instead of text. /generate_mesh accepts either a text prompt or an image, but not both in the same request.
You can use a Part in your workspace as a bounding box. If you select a Part before entering a prompt, Assistant uses the Part's size and location as input and ensures the generated mesh fits within the defined space.
You can also define a maximum triangle count for the returned model. Lower values result in more faceted and low-poly generations. This is an optional input, which defaults to 10,000.

Procedural models
Use the /generate_procedural_model command to generate procedural models that scale and adapt automatically.
Procedural models let you:
- Create flexible 3D models with minimal input and adjust parameters without having to rebuild your models.
- Automatically integrate with engine features like undo/redo, Team Create, network replication, scaling, and dragger tools.
- Maintain high performance, with models behaving like standard objects until their parameters change. This means these models add almost no overhead to your game.
- Keep generated content organized in a dedicated GeneratedFolder, separating source and output.
To generate a procedural model, type a command such as /generate_procedural_model a stack of books or attach a reference image to your prompt. Assistant then generates the procedural model and adds it directly to your workspace for further customization.

Segmentation
Segmentation divides a generated asset into individual parts, giving you more control over how you customize it. You can apply different materials, attach scripts, or replace individual components without regenerating the entire model.
When you run /generate_mesh or /generate_procedural_model with a text prompt, Assistant suggests a segmentation plan that defines how the model will be divided. Before generating the model, you can:
- Edit the Prompt to refine your description.
- OPTIONALUpload a Hint Image to use as a visual reference. If you upload a hint image, Assistant skips the preview step and generates the final model directly.
- Add or remove entries under Part Names to control how the model is segmented. Each generated model can have up to eight parts.
- Check Suggest segmentation to have Assistant regenerate the part list based on your prompt.
When you're happy with the configuration, click Confirm to generate four preview images. If none of the previews match what you have in mind, click Back to adjust the segmentation plan and create a new set of previews. Once you find one you like, select it and click Confirm to create the final model. When it's ready, click Add to place to insert the asset into your game.
For example, if you generate a skateboard and define five parts (body, left rear wheel, right rear wheel, left front wheel, and right front wheel), Assistant divides the model into those components so you can modify each one independently.


Segment imported meshes
You can also segment individual meshes that you import into Studio with the 3D Importer. Segmenting an imported mesh lets you modify individual parts without editing and reimporting the original model. For example, you can apply different materials or scripts to specific parts, or replace individual components like the wheels of a car, the hilt of a sword, or the arms of a robot.
To segment an imported mesh:
- Open Assistant and enter /segment_mesh.
- Enter up to five names for the parts you want to create. You can use any part names, but the recommended part names for common object types produce the most reliable results.
- Click Confirm. Assistant segments the mesh into the specified parts and replaces the original mesh in the workspace with the segmented version.
To create more than five parts, run /segment_mesh again on the segmented mesh.
Recommended part names
While any generated asset can be segmented, the recommended part names below currently produce the most reliable results for their corresponding object types.
When defining your own segmentation, use these part names as a starting point and customize them as needed.
| Object type | Recommended part names |
|---|---|
| car | body, left front wheel, right front wheel, left rear wheel, right rear wheel |
| ambulance / police car | body, left front wheel, right front wheel, left rear wheel, right rear wheel, siren light bar |
| combat car | body, left front wheel, right front wheel, left rear wheel, right rear wheel, gun |
| tow truck | body, left front wheel, right front wheel, left rear wheel, right rear wheel, tow hook |
| trailer | body, left wheel, right wheel, hitch |
| motorcycle | frame, handlebars, front fork, front wheel, rear wheel |
| skateboard | body, left front wheel, right front wheel, left rear wheel, right rear wheel |
| prop plane | body, propeller |
| combat prop plane | body, propeller, gun |
| jet plane | body, thruster |
| helicopter | body, main rotor blade |
| combat helicopter | body, main rotor blade, gun |
| drone | body, left front propeller, right front propeller, left rear propeller, right rear propeller |
| jetpack | pack, thruster |
| motor boat | body, motor |
| combat motor boat | body, motor, cannon |
| submarine | hull, propeller |
| flashlight | handle body, head, lens |
| treasure chest | body, lid |
| pickaxe | handle, head |
| gun | grip, frame, barrel |
| sniper rifle | grip, frame, barrel, scope |
| turret | tripod base, swivel mount, gun body, barrel, shield plate |
| cannon | carriage base, barrel, left wheel, right wheel |
| wand | handle, tip |
| sword | handle, hand guard, blade, pommel |
| baseball bat | handle, barrel |
| grenade | grenade body, safety lever, pull pin |
For more examples of working with segmented models, see the Behaviors Reference game .rbxl file.
Planning Mode
Planning Mode lets you preview Assistant's next steps before execution. When you submit a complex request, Assistant generates a plan that you can review and adjust.
You can activate Planning Mode by either:
- Clicking the dropdown in the Assistant input panel and selecting Plan.
- Entering the command /plan in Assistant.

Editable Markdown plans
Generated plans are saved as editable Markdown documents that persist across chat sessions, so you can fine-tune workflows before they execute.
- Cross-session cloud storage: Plans are stored in the cloud and tied to both your experience and creator profile rather than to a single chat session. Like Assistant chat history, plans are private and are not visible to collaborators.
- Integrated Markdown editor: After Assistant creates a plan, click Open Plan in the chat interface to launch the dedicated Markdown editor, where you can review the formatted document or modify its contents directly.
- Save and update plans: Click Save to push a diff of your manual edits back to Assistant, which updates its underlying task list. Conversely, prompting Assistant in chat automatically updates the plan Markdown file.
- Explicit approval gate: Plans never auto-execute or time out into acceptance. The workflow only executes when you click Build in the Assistant chat.